关于 gitalk
Gitalk 是一个基于 GitHub Issue 和 Preact 开发的评论插件。 https://gitalk.github.io/
特性
- 使用
GitHub登录 - 支持多语言
[en, zh-CN, zh-TW, es-ES, fr, ru, de, pl, ko, fa, ja] - 支持个人或组织
- 无干扰模式(设置
distractionFreeMode为true开启) - 快捷键提交评论 (
cmd|ctrl + enter)
安装
cdn方式直接引入
<link rel="stylesheet" href="https://cdn.jsdelivr.net/npm/gitalk@1/dist/gitalk.css" />
<script src="https://cdn.jsdelivr.net/npm/gitalk@1/dist/gitalk.min.js"></script>
<!-- or -->
<link rel="stylesheet" href="https://unpkg.com/gitalk/dist/gitalk.css" />
<script src="https://unpkg.com/gitalk/dist/gitalk.min.js"></script>npm方式安装
npm i --save gitalkimport 'gitalk/dist/gitalk.css'
import Gitalk from 'gitalk'使用
- 通过
javascript代码生成插件
<!-- 添加容器 用于显示评论 -->
<div id="gitalk-container"></div>
<!-- 代码生成 gitalk 插件 -->
<script type="text/javascript">
  var gitalk = new Gitalk({
    clientID: 'GitHub Application Client ID',
    clientSecret: 'GitHub Application Client Secret',
    repo: 'GitHub repo',
    owner: 'GitHub repo owner',
    admin: ['GitHub repo owner and collaborators, only these guys can initialize github issues'],
    id: location.pathname, // Ensure uniqueness and length less than 50
    distractionFreeMode: false, // Facebook-like distraction free mode
  });
  // 实例方法: render 初始化渲染并挂载插件。
  gitalk.render('gitalk-container');
</script>- 通过组件方式使用
import GitalkComponent from 'gitalk/dist/gitalk-component';

<GitalkComponent
  options={{
    clientID: '...',
    // ...
    // 设置项
  }}
/>;
配置项
非必须项均存在默认值。 了解更多
| key | type | required | description |
|---|---|---|---|
| clientID | String | 必须 | GitHub Application Client ID. |
| clientSecret | String | 必须 | GitHub Application Client Secret. |
| repo | String | 必须 | GitHub repository. |
| owner | String | 必须 | GitHub repository 所有者,可以是个人或者组织。 |
| admin | Array | 必须 | GitHub repository 的所有者和合作者 (对这个 repository 有写权限的用户)。 |
| id | String | 非必须 | 页面的唯一标识。长度必须小于 50,Default: location.href. |
| number | Number | 非必须 | 页面的 issue ID 标识,若未定义number属性则会用id定位。 |
| labels | Array | 非必须 | GitHub issue 的标签。 |
| title | String | 非必须 | GitHub issue 的标题。 |
| body | String | 非必须 | GitHub issue 的内容。 |
| language | String | 非必须 | 语言支持 [en, zh-CN, zh-TW, es-ES, fr, ru, de, pl, ko, fa, ja]。 |
| perPage | Number | 非必须 | 每次加载的数据大小,最多 100。 |
| distractionFreeMode | Boolean | 非必须 | 类似 Facebook 评论框的全屏遮罩效果 |
| pagerDirection | String | 非必须 | 评论排序 last为按评论创建时间倒序,first正序。 |
| createIssueManually | Boolean | 非必须 | 如果当前页面没有相应的 isssue 且登录的用户属于 admin,则会自动创建 issue。如果设置为 true,则显示一个初始化页面,创建 issue 需要点击 init 按钮。 |
| proxy | String | 非必须 | GitHub oauth 请求到反向代理,为了支持 CORS。 |
| flipMoveOptions | Object | 非必须 | 评论列表的动画 |
| enableHotKey | Boolean | 非必须 | 启用快捷键(cmd|ctrl + enter) 提交评论 |
repo: github 仓库的名称(注意不是地址) ...
必须项 clientID、clientSecret 是通过 Github App、OAuth App 创建生成的,怎么创建呢?
关于 Github App、OAuth App
官方的说法:
GitHub Apps are first-class actors within GitHub. A GitHub App acts on its own behalf, taking actions via the API directly using its own identity, which means you don't need to maintain a bot or service account as a separate user.
简言之就是: 通过 Github 提供的认证信息去调用 Github API。
- 两者异同点:
OAuth App 使用方式和 Github App 非常类似,最大的不同点是 OAuth App 所获取的权限都是固定且只读的,用户只能读取固定的数据而不能修改数据;而 Github App 几乎可以获取Github提供的所有功能权限,且所获取的权限可以被设定为“只读”,“可读可写”和“禁止访问”,对于权限的授权粒度会更细。
第三方登录的原理
Github App 可以免去用户在第三方页面输入账号密码或者 Token 的操作而完成授权,原理:
A网站跳转到Github的授权页面。Github授权页面询问用户:“是否允许A网站获取下列权限”,用户点击“允许”,取得授权码。Github授权页面重定向回A网站,同时在URL上带上授权码。A网站通过URL上的授权码往Github取回Token。A网站使用这个Token去调用Github API。
要完成上述的流程,首先必须先注册一个 Github App。
添加 gitalk 评论
创建仓库
gitalk 是基于 Github 的 Issue的,需要指定仓库来承载评论, 当然这个仓库可以是你现有的 blog 仓库,也可以单独创建。
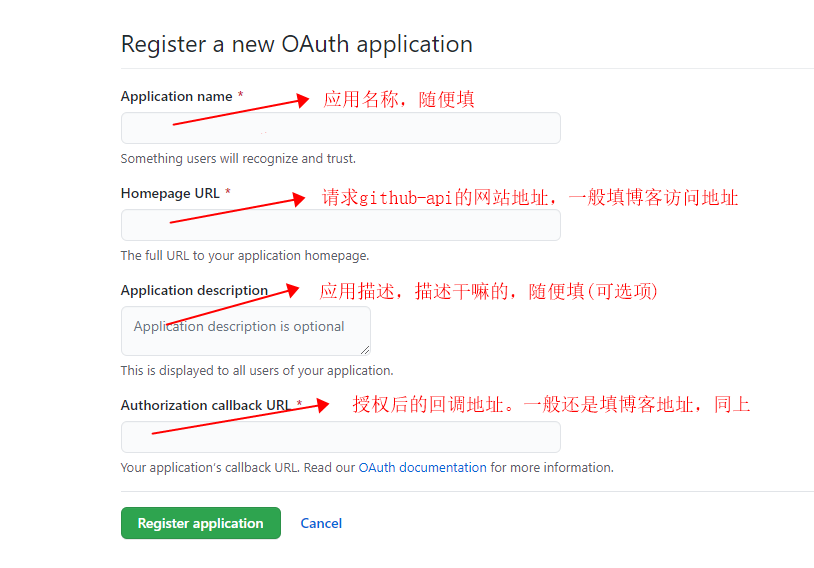
创建 OAuth App
创建成功后生成 clientID、clientSecret 凭证,供 hexo 获取用于调用 github-api 的 token.
- 登录 -> 点击头像进入 Settings -> 点击进入 Developer settings -> 点击左侧 OAuth App面板 -> 点击 New OAuth App
- or 链接
集成插件
部分 hexo 框架已经集成了 gitalk 插件资源,只需要开启配置就可以了,如果是用于别的系统或博客,可以通过上面的“gitalk 安装使用” 完成集成.
过程问题记录
按着流程,一步一步小心翼翼的完成所有配置,遇到了一些坑,有因为自己 sb 导致的问题,也有因为版本导致的问题.
Error: Not Found.
出现这个现象,打开调试模式发现:issues 报错(找不到配置中填写的仓库),验证: 浏览器打开 https://github.com/用户名/你配置的仓库名称, 观察是否能够访问
- 打开即显示:未找到相关的
Issues进行评论 请联系*** 初始化创建(同时接口报错)
开始我以为是真的没有初始化创建导致的,点击授权后,redirect 回来 评论这个地方一直 loading 然后报错 403。
打开调试模式: issues 接口正常,数据为空(现在还没有评论数据,正常),说明仓库没有问题,是创建好的,继续观察有没有接口报错: user 接口报错,说明配置的 github 账号在登录过程中出了问题,没有登录成功, access_token 报错 403。
通过查阅,最后发现了这个:
PSA: Public demo server (cors-anywhere.herokuapp.com) will be very limited by January 2021, 31st
The demo server of CORS Anywhere (cors-anywhere.herokuapp.com) is meant to be a demo of this project. But abuse has become so common that the platform where the demo is hosted (Heroku) has asked me to shut down the server, despite efforts to counter the abuse (rate limits in [#45](https://github.com/Rob--W/cors-anywhere/issues/45) and [#164](https://github.com/Rob--W/cors-anywhere/issues/164), and blocking other forms of requests). Downtime becomes increasingly frequent (e.g. recently [#300](https://github.com/Rob--W/cors-anywhere/issues/300), [#299](https://github.com/Rob--W/cors-anywhere/issues/299), [#295](https://github.com/Rob--W/cors-anywhere/issues/295), [#294](https://github.com/Rob--W/cors-anywhere/issues/294), [#287](https://github.com/Rob--W/cors-anywhere/issues/287)) due to abuse and its popularity.
To counter this, I will make the following changes:
1. The rate limit will decrease from 200 ([#164](https://github.com/Rob--W/cors-anywhere/issues/164)) per hour to 50 per hour.>2. By January 31st, 2021, cors-anywhere.herokuapp.com will stop serving as an open proxy.>3. From February 1st. 2021, cors-anywhere.herokuapp.com will only serve requests after the visitor has completed a challenge: The user (developer) must visit a page at cors-anywhere.herokuapp.com to temporarily unlock the demo for their browser. This allows developers to try out the functionality, to help with deciding on self-hosting or looking for alternatives.
因为 gitalk 是基于 cors-anywhere.herokuapp.com 实现的反向代理。cors-anywhere 禁用了, gitalk 没有拿到 github 的授权,导致问题出现。问题原因找到了,那我们怎么解决呢?白嫖公共的 CORS proxy ? 自己部署?有没有师兄同样遇到了这个问题,怎么解决的?
白嫖公共的 CORS proxy,得需要改 gitalk.js 的源码,局限性高,并不太好。想着 gitalk 也用到了这个,于是在翻了文档后发现:
在
1.7.2版本的gitalk.min.js中,proxy已经换成了https://cors-anywhere.azm.workers.dev/https://github.com/login/oauth/access_token
更新版本到 1.7.2 – 修改 cdn 引用即可
- gitalk_js:
- gitalk_css:
+ gitalk_js: //cdn.jsdelivr.net/npm/gitalk@1.7.2/dist/gitalk.min.js
+ gitalk_css: //cdn.jsdelivr.net/npm/gitalk@1.7.2/dist/gitalk.css 除此之外,在另外一篇文章里我介绍了添加自动化创建 Issues 的过程。详见 【Hexo-Gitalk 评论模块的自动化创建】