目前已经有很多成熟的方案,为 hexo 或者自建博客提供音乐播放器插件使用。
我将从不同的角度介绍这几种方式:
基于外链生成播放器插件
网易云音乐
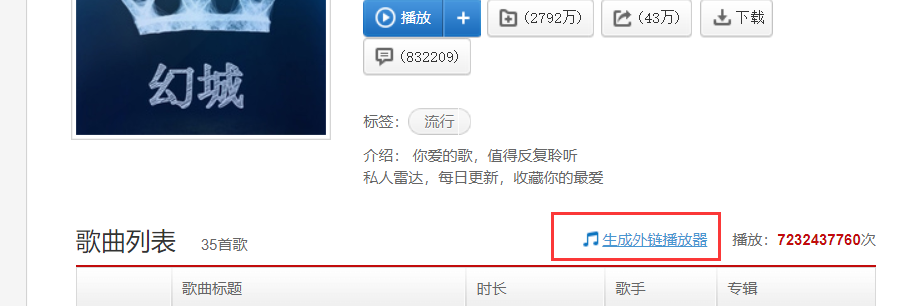
前往网易云音乐官网,搜索一个作为背景音乐的歌曲,并进入播放页面,点击 生成外链播放器
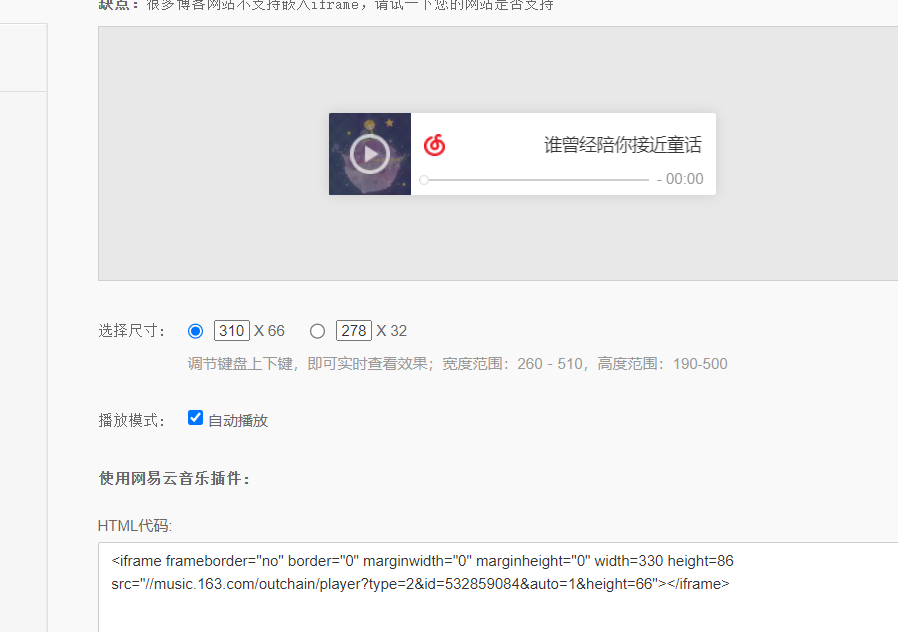
设置好想要显示的样式后,复制 html 代码
最好外层在加一个 div,如下,可直接将上一步复制的 iframe 替换下方里面的 iframe
<div id="musicMouseDrag" style="position:fixed; z-index: 9999; bottom: 0; right: 0;">
  <div
    id="musicDragArea"
    style="position: absolute; top: 0; left: 0; width: 100%;height: 10px;cursor: move; z-index: 10;"></div>
  <iframe
    frameborder="no"
    border="0"
    marginwidth="0"
    marginheight="0"
    width="330"
    height="86"
    src="//music.163.com/outchain/player?type=2&id=38592976&auto=1&height=66">
  </iframe>
</div>
默认给的样式是显示在右下角,可以通过调整上一步粘贴的 div 的 style 中 bottom 和 right 来调整位置。
自由拖动
如果需要自由拖动,在刚才添加的代码后面,再添加下面代码即可,鼠标就可以在音乐控件的 上边沿 点击拖动。
var $DOC = $(document);
var $musicMouseDrag = $('#musicMouseDrag');
var $musicDragArea = $('#musicDragArea');
var $moveTarget = $musicMouseDrag;
var borderWidth = 1;

$musicMouseDrag.on('mousedown', function (e) {
  e.preventDefault(); // 阻止默认事件,如文本选中

  var div_x = e.pageX - $moveTarget.offset().left;
  var div_y = e.pageY - $moveTarget.offset().top;

  $DOC
    .on('mousemove.drag', function (e) {
      var targetX = e.pageX - div_x;
      var targetY = e.pageY - div_y;

      // 限制拖动范围
      targetX = Math.min(Math.max(targetX, 0), window.innerWidth - $moveTarget.outerWidth());
      targetY = Math.min(Math.max(targetY, 0), window.innerHeight - $moveTarget.outerHeight());

      $moveTarget.css({
        left: targetX + 'px',
        top: targetY + 'px',
        bottom: 'inherit',
        right: 'inherit',
        border: borderWidth + 'px dashed grey', // 显示边框
      });
    })
    .one('mouseup', function () {
      $DOC.off('mousemove.drag');
      $moveTarget.css('border', 'none'); // 隐藏边框
      $musicDragArea.css('height', '10px');
    });
});
网易云单曲外链没什么问题,但不能满足列表歌单的需求...😗😗😗
基于 hexo-tag-aplayer 插件
hexo-tag-aplayer 是 APlayer (opens new window) 播放器的 Hexo 标签插件,可以十分方便地在文章内插入音乐播放器。
安装
在根目录执行:
npm install hexo-tag-aplayer -s配置
修改 Hexo 的根目录配置文件 _config.yml:
aplayer:
  # 示例配置
  cdn: https://cdn.jsdelivr.net/npm/aplayer@latest/dist/APlayer.min.js
  style_cdn: https://cdn.jsdelivr.net/npm/aplayer@latest/dist/APlayer.min.css
  meting: true
  meting_cdn: https://cdn.jsdelivr.net/npm/meting@1/dist/Meting.min.js

  # 完整配置如下: --- 一般不需要配置这么多  ---
  # script_dir: some/place # Public 目录下脚本目录路径,默认: 'assets/js'
  # style_dir: some/place # Public 目录下样式目录路径,默认: 'assets/css'
  # cdn: http://xxx/aplayer.min.js # 引用 APlayer.js 外部 CDN 地址 (默认不开启)
  # style_cdn: http://xxx/aplayer.min.css # 引用 APlayer.css 外部 CDN 地址 (默认不开启)
  # meting: true # MetingJS 支持
  # meting_api: http://xxx/api.php # 自定义 Meting API 地址
  # meting_cdn: http://xxx/Meing.min.js # 引用 Meting.js 外部 CDN 地址 (默认不开启)
  # asset_inject: true # 自动插入 APlayer.js 与 Meting.js 资源脚本, 默认开启
  # externalLink: http://xxx/aplayer.min.js # 老版本参数,功能与参数 cdn 相同
使用
使用 hexo-tag-aplayer 非常简单,只需要在 MarkDown 文件中插入正确的标记就可以了。
{% aplayer title author url [picture_url, narrow, autoplay, width:xxx, lrc:xxx] %}开启了文章资源文件夹 (opens new window)功能, 可以这样使用:
{% aplayer "Caffeine" "Jeff Williams" "caffeine.mp3" "picture.jpg" "lrc:caffeine.txt" %}配置稍显复杂且麻烦…😂😂😂…
或者…如果你开启了 meting 配置:即上面 yml 内 aplayer.meting 设置为 true,配置将变得很简单了:
{% meting "002j785c33YQHT" "tencent" "song" %}例如:
{% meting "754708245" "netease" "playlist" "theme:#C20C0C" %}具体的 {% meting %} 参数可以参考:https://easyhexo.com/3-Plugins-use-and-config/3-1-hexo-tag-aplayer/#metingjs
切换页面不中断播放
几乎所有的博客框架都支持播放器功能,每个框架提供的不中断方案也不相同,以我目前使用的主题为例,找到主题下的yml,开启配置中的 pjax:
pjax:
  enable: true
或者手动引入 pjax 相关的 cdn 资源:
CDN:
  jquery: //cdn.jsdelivr.net/npm/jquery@3.5.1/dist/jquery.min.js
  pjax: //cdn.jsdelivr.net/npm/jquery-pjax@2.0.1/jquery.pjax.min.js
为了正确加载音乐播放器,当切换到的文章页面也存在音乐播放器时,播放会中断重新加载
这种方式,满足了 md 文章内的播放器实现,以及切换不中断的效果。但…我其实更想要能外挂在全局的那种,方便随时切换歌曲…😣😣😣
全局播放器
我们只需要关心如何在页面公共区域挂载一个 dom 控制歌曲切换。至于播放器的实现,由于不需要考虑在 md 文件中引入,所以无需安装 hexo-tag-aplayer,只需要引入 APlayer 和 MetingJs 即可。
安装
tip:由于最新的MetingJs 2.x版本与APlayer版本不兼容,所以一般都是使用1.x 的 MetingJs。
通过 cdn 引入 script:
<link rel="stylesheet" href="https://cdn.jsdelivr.net/npm/aplayer@1.10.1/dist/APlayer.min.css" />
<script src="https://cdn.jsdelivr.net/npm/aplayer@1.10.1/dist/APlayer.min.js"></script>
<script src="https://cdn.jsdelivr.net/npm/meting@1.2.0/dist/Meting.min.js"></script>
或者开启根目录下的 yml 配置自动引入,如下:
aplayer:
  # 示例配置
  cdn: https://cdn.jsdelivr.net/npm/aplayer@latest/dist/APlayer.min.js
  style_cdn: https://cdn.jsdelivr.net/npm/aplayer@latest/dist/APlayer.min.css
  meting: true
  meting_cdn: https://cdn.jsdelivr.net/npm/meting@1/dist/Meting.min.js
通用使用
如果你的博客框架使用的是单页面应用框架实现的,那么你只需要在公共组件wrapper 里添加相应挂载的 dom 即可,否则,你需要像前面提到的一样,另外手动引入 pjax 相关资源文件。
外挂 dom 实现:
<div
  class="aplayer"
  data-id="754708245"
  data-server="netease"
  data-type="playlist"
  data-fixed="true"
  data-listfolded="true"
  data-autoplay="false"
  data-order="list"
  data-volume="0.5"
  data-theme="#1da496"
  data-preload="auto"></div>

<!-- 优化样式 --- 觉得默认的不太好看 -->
<!-- 发现歌词出现在了播放器外,可能设计是这样的,但是我想把它放到播放器内部进度条位置 -->
<style>
  .aplayer.aplayer-fixed .aplayer-lrc,
  .aplayer.aplayer-fixed .aplayer-body {
    position: absolute !important;
    z-index: 999 !important;
  }
</style>
</style>
主题博客中使用
如果你使用了和我相同的博客主题,开启全局播放器只需要修改主题下的 _config.yml 文件即可,如下(如果切换页面中断,只需要如上所说开启 pjax 即可):
aplayer:
  # https://yun.yunyoujun.cn/guide/additional-package-support.html#%E6%92%AD%E6%94%BE%E5%99%A8
  global: true
  meting: true
  # https://github.com/metowolf/MetingJS/tree/v1.2#option
  widget:
    enable: true
    autoplay: false
    theme: "#1da496"
    # loop: all
    order: list
    preload: auto
    volume: 0.5
    mutex: true
    lrcType: 0
    listFolded: true
    listMaxHeight: 340px
    # audio:
    #   - name: 星宿计时
    #     artist: 杉田朗/洛天依
    #     url: https://cdn.jsdelivr.net/gh/YunYouJun/cdn/audio/star-timer.mp3
    #     cover: https://cdn.jsdelivr.net/gh/YunYouJun/cdn/img/bg/stars-timing-0.jpg
    meting:
      enable: true
      id: 754708245
      server: netease
      type: playlist
最终效果
