在此之前,你需要先了解如何发布一个 npm-package?,以及 Vue.use 和 Vue.component 实现。
注意:从
UI组件功能实现到打包构建,本文主要是均是针对Vue3写的,如果你需要在Vue2中使用,需要单独提供可用于Vue2的UI库…
初始化项目
脚手架构建
因为是从 0 到 1 构建,所以就选择了 vue3 了,参考 https://vuejs.org/guide/quick-start.html
npm create vue@latest
✔ Project name: … xxxxx
✔ Add TypeScript? … No / Yes
✔ Add JSX Support? … No / Yes
✔ Add Vue Router for Single Page Application development? … No / Yes
✔ Add Pinia for state management? … No / Yes
✔ Add Vitest for Unit testing? … No / Yes
✔ Add an End-to-End Testing Solution? … No / Cypress / Playwright
✔ Add ESLint for code quality? … No / Yes
✔ Add Prettier for code formatting? … No / Yes
Scaffolding project in .xxxxx…
Done.
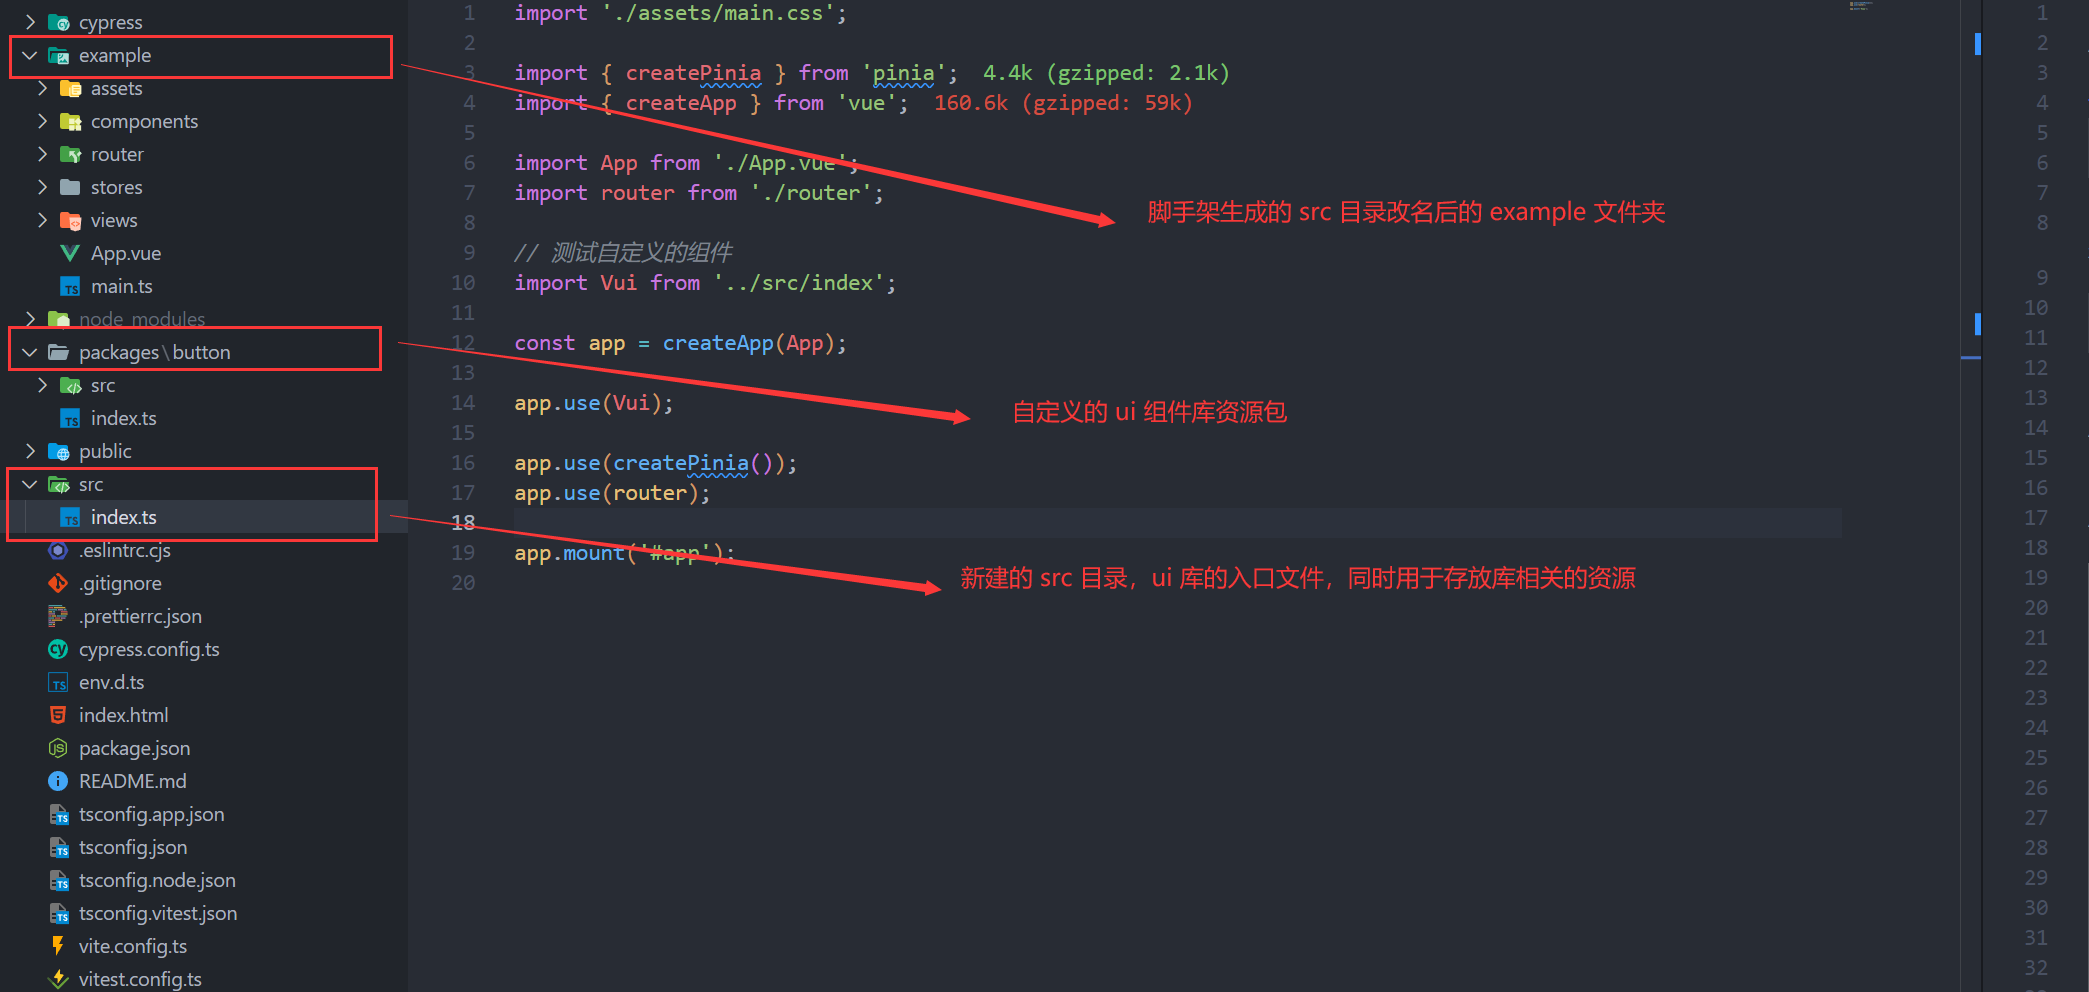
目录结构调整
默认生成的项目目录结构如下:

你很容易发现,大多数的 UI 项目组件库,都是将 Demo 调试资源放置在了 example/ 目录下,而组件资源则放置到了 packages/。
为了保证结构化统一,我们需要重命名 src 为 example(demo 展示,可以直接是一个完整的 vue 项目 ☺☺☺):
此外,我们需要再新建一个 src 和 packages 文件夹,作为组件包的实际入口文件以及包相关的资源。修改后的核心目录说明:
example:用于测试组件的相关功能,用作UI组件的Demo展示(原脚手架创建的src目录)。packages:用于存放封装的自定义组件,仅含文件夹,每个子文件夹代表一个组件资源。src:组件库打包的入口文件存放处,同时也可以存放UI库相关的其他资源,例如指令、工具函数、类型定义等。
新目录结构如下:
配置调整
由于修改了原脚手架的 src 目录名称,又新建了资源目录,所以需要我们对项目配置做相应的调整:
- 修改
index.html的script.src属性,由/src/main.ts修改为/example/main.ts
- <script type="module" src="/src/main.ts"></script>
+ <script type="module" src="/example/main.ts"></script>- 修改
vite.config.ts中的resolve.alias @符号的别名配置
- '@': fileURLToPath(new URL('./src', import.meta.url))
+ '@': fileURLToPath(new URL('./example', import.meta.url))- 修改
package.json中的format指令prettier的文件夹路径
- "format": "prettier --write src/"
+ "format": "prettier --write src/ example/ packages/"- 修改
tsconfig.app.json下相关路径,并添加include配置
{
  // ...
  "include": [
    "env.d.ts",
    "src/**/*",
    "packages/**/*",
    "packages/**/*.vue",
    "example/**/*",
    "example/**/*.vue"
  ],
  "exclude": ["example/**/__tests__/*"],
  "compilerOptions": {
    "composite": true,
    "baseUrl": ".",
    "paths": {
      "@/*": ["./example/*"]
    }
  }
}
注意:由于缓存的问题,修改了配置后,可能仍存在异常提示,这时需要手动清除掉
node_modules/.vite目录,关掉服务,并重启编辑器,再重启项目。
组件库设计
本文旨在记录组件库的实现过程和思路,所以只写了两个 demo 组件。后续如有需要,会在此基础上添加完善其他的组件实现 😶😶😶
Demo 按钮组件实现
在 packages/ 文件夹下创建 button/ 文件夹,用于存放按钮组件相关资源。
由于 vue3 版本改动原因,v-listeners 被合并到 $attrs 统一处理,所以就没有绑定 v-on="$listeners" 了
// packages/button/src/index.vue

<script setup lang="ts"></script>

<script lang="ts">
  export default {
    name: 'VuiButton',
  };
</script>

<template>
  <div>
    <!-- vue3 the $listeners is deprecated -->
    <button type="button" class="vui-button" v-bind="$attrs">
      <slot></slot>
    </button>
  </div>
</template>

<style lang="less" scoped>
  .vui-button {
    color: #317a2e;
  }
</style>
style 样式也可以是单独的 less 文件,通过 src 引入即可.
less 支持
由于脚手架并没有内置 less,所以需要单独安装:
yarn add less less-loader -D并在 vite.config.ts 中添加如下配置:
export default defineConfig({
  // ...
  css: {
    preprocessorOptions: {
      less: {
        javascriptEnabled: true,
      },
    },
  },
});
单组件插件注册支持
在此之前,回顾一下 app.use(plugin) 注册插件时,plugin 需要满足的基础结构:
export default { install } 或者 export default function(app) {}...
ok,现在我们需要针对 VuiButton 完成插件设计,即app.use(VuiButton) 支持:
// packages/button/index.ts

import type { App } from 'vue';
import VuiButton from './src/index.vue';

VuiButton.install = function (app: App) {
  app.component((VuiButton.name || VuiButton.__name)!, VuiButton);
};

type WithInstall<T> = T & { install(app: App): void };

export default VuiButton as WithInstall<typeof VuiButton>;如上所示,一个单一的组件功能和结构就实现好了,它已经具备了被集成的基础条件。
后续只需要同 Button 组件一样,在该 packages/ 文件夹下开发其他组件就行了。
额…你应该也发现了,封装成模块,貌似我们这个组件库还差一个程序入口…
组件库入口文件设计
在根目录下新创建的 src 下面新建入口文件 index.ts,实现并导出 install 方法。
和单一组件库不同的是,组件库需要对所有组件进行全局注册,并添加额外的配置和扩展。详细可文章开头描述
具体实现:
// /src/index.ts

import type { App } from 'vue';
import Button from '../packages/button';
import Text from '../packages/text';
// ...other component

type InstallFunction = {
  (app: App, options?: { size?: 'small' | 'middle' | 'large'; theme?: 'dark' | 'light' }): void;
  installed?: boolean;
};

interface Window extends globalThis.Window {
  [k: string]: any;
}

// 所有自定义的组件
const vuiComponents = [Button, Text];

// 支持 use.use 全局注册所有组件
const install: InstallFunction = function (app, options = {}) {
  // 因为组件内部实现了 install 方法,所以可以直接 Vue.use
  vuiComponents.forEach((component) => app.use(component));

  // 如果没有实现,则如下:
  // vuiComponents.forEach(component => Vue.component(component.name || component.__name, component))

  // -------------------------------------------------------

  // vue3 使用 app.config.globalProperties 替代 prototype
  if (app.config.globalProperties) {
    app.config.globalProperties.$vui = {
      ...options,
      size: options.size || 'middle',
      theme: options.theme || 'light',
    };
    // 组件内部 使用以下方式读取:
    // import { getCurrentInstance } from 'vue';

    // const app = getCurrentInstance();
    // const vuiConfig = app?.appContext.config.globalProperties.$vui
  }

  // vue2 版本的全局配置
  // Vue.prototype.$vui = {
  //   ...options,
  //   size: options.size || 'middle',
  //   theme: options.theme || 'light',
  // };
};

// tips: 下面逻辑主要是为 vue2 提供,直接给浏览器或 AMD loader 使用,引入 script 即可完成注册
{
  const contentWindow = globalThis as unknown as Window;

  if (contentWindow?.Vue?.use) {
    install(contentWindow.Vue);
  }
}

//! 当在 Vue3 项目中作为 script 引入时:
{
  // 方案一: 推荐 --- 先引入 vue3 和 vui 的 script,然后通过 `app.use(window.Vui)` 来手动注册

  // 方案二:将实例化后的 app 作为属性挂载到 window 上,例如 window.__VUE__,详见 ../example/demo/vue3Demo.html
  const contentWindow = globalThis as unknown as Window;

  if (contentWindow && !contentWindow.Vue?.use && contentWindow.__VUE__?.use) {
    install(contentWindow.__VUE__);
  }
}

// 解构导入 eg. import { Button } from 'vui-project'; app.use(Button);
export { default as Button } from '../packages/button';
export { default as Text } from '../packages/text';

export default {
  install, // 用于ES modules,import Vue 后直接使用 Vue.use()
  Button,
  Text, // eg. Vui.Text
  // ...other component
};
Tips:
由于
vue3 和 vue2的版本差异性,vue3中插件install方法的第一个参数app,并不能访问到prototype。意味着之前vue2通过prototype为全局添加配置的方式不适用了,可以通过 **app.config.globalProperties 替代 prototype**,参考上面实现。导出
export { default as Button } from '../packages/button';是为了支持解构导入。方便后续在使用该UI库时,仅引入部分组件进行注册。eg. import { Button } from 'vui-project'; app.use(Button);最后
export default { install, Button}中也导出了组件,方便在使用该UI库时,可以通过import Vui from 'vui-project'; const { Button } = Vui; 或者 Vui.Button的方式使用单个组件。
Typescript 支持
定义类型
根目录下新增 types/ 文件夹,用于存放组件库相关的类型定义。
例如:
// types/index.d.ts

import Vue, { App, DefineComponent } from 'vue';

export type VuiComponentSize = 'small' | 'middle' | 'large';

export type VuiComponentTheme = 'dark' | 'light';

export interface InstallFunctionOptions {
  size?: VuiComponentSize;
  theme?: VuiComponentTheme;
}

export function install(vue: App, options?: InstallFunctionOptions): void;

/* --------------------------------------- */

// Vue2
// export declare class VuiComponent extends Vue {
//   static install(app: App): void;
// }

// Vue3
type WithInstall<T> = T & { install(app: App): void };
// T is propsType
export declare type VuiComponent<T> = WithInstall<DefineComponent<T>>;

/* --------------------------------------- */

// VuiButton  ---------- 可以单独将组件类型定义抽离至独立文件 eg. button.d.ts  ------------
interface VuiButtonProps {
  // component props...
  type: 'primary' | 'success' | 'warning' | 'danger' | 'info' | 'text';
  // ...
}
export declare const Button: VuiComponent<VuiButtonProps>;
// ... other component
修改配置
修改 package.json 的 typings 和 files 字段:
{
  # 指明模块的类型入口
+ "typings": "types/index.d.ts",
  "files": [
    "lib",
    # npm 发布时,将 types 包含到模块内
+   "types"
  ]
}
打包构建 umd
脚手架提供的 build、build-only 指令默认是打包的 example 内的资源(因为前面调整过 index.html 的入口路径)。
所以为了区分,单独提供一个文件用于打包组件库相关的资源:
添加组件库打包配置文件 viteLib.config.ts
别忘记把打包后的 lib 文件夹添加到 .gitignore
import vue from '@vitejs/plugin-vue';
import vueJsx from '@vitejs/plugin-vue-jsx';
import { resolve } from 'path';
import { defineConfig } from 'vite';

// https://vitejs.dev/config/
export default defineConfig({
  plugins: [vue(), vueJsx()],
  css: {
    preprocessorOptions: {
      less: {
        javascriptEnabled: true,
      },
    },
  },
  build: {
    outDir: 'lib',
    lib: {
      // Could also be a dictionary or array of multiple entry points
      entry: resolve(__dirname, 'src/index.ts'),
      name: 'Vui',
      // the proper extensions will be added
      fileName: 'vui',
    },
    rollupOptions: {
      external: ['vue'],
      output: {
        format: 'umd', // 输出格式为 UMD
        name: 'Vui', // UMD 全局变量名称 --- 未指定则使用 lib.name
        globals: {
          vue: 'Vue', // key: 库中的模块依赖项的名称, value: 在浏览器中访问这个模块依赖项时应该使用的全局变量的名称
        },
      },
    },
  },
});
因为
UI库是由Vue3写的,使用一般也是在该环境下,为了避免造成产物冗余,需要在external中添加上外部化的依赖,以在打包的时候剔除。当
output产物是umd格式时,可以直接通过script引入使用,所以需要提供一个全局变量,支持开发者通过全局变量来访问库的一些功能。配置用于指定模块依赖项与全局变量之间的映射关系,例如上面配置的vue模块和Vue全局变量映射)
Vite默认的formats有es和umd两种格式,所以即使没有配置打包后也会生成两份文件。
添加组件库打包脚本指令
// package.json

{
  // ...
  "scripts": {
    // ...
    "build:lib": "vite build --config viteLib.config.ts"
  }
}
执行组件库打包命令:
yarn build:lib生成构建后的资源文件,如下图所示:

偶买噶…css 资源被单独打包出来了….
将 CSS 打包进 JS
作为一个独立组件库,我不希望每次使用的时候再单独引入 css 资源,所以下面做一些优化处理:
呃…翻了下 vite 文档,基于某些原因,官方并没有提供该类需求的配置,在 issues 里找到了实现方案:通过 vite-plugin-css-injected-by-js 插件,将 css 通过 js 注入到页面中:
yarn add vite-plugin-css-injected-by-js -D
修改 viteLib.config.ts 打包配置:
import { defineConfig } from 'vite';
import cssInjectedByJsPlugin from 'vite-plugin-css-injected-by-js';

export default defineConfig({
  plugins: [
    cssInjectedByJsPlugin(),
    // ... other plugins
  ],
  // ... other config
});
重新执行 yarn build:lib,css 文件终于没了~~~,生成的两个文件:
/lib/vui.mjs:基于es格式的模块包(更好地利用模块化的优势,提高代码的可维护性和可重用性)
/lib/vui.umd.js:一个直接给浏览器或AMD loader使用的umd格式包
组件库功能测试
UMD 链接测试
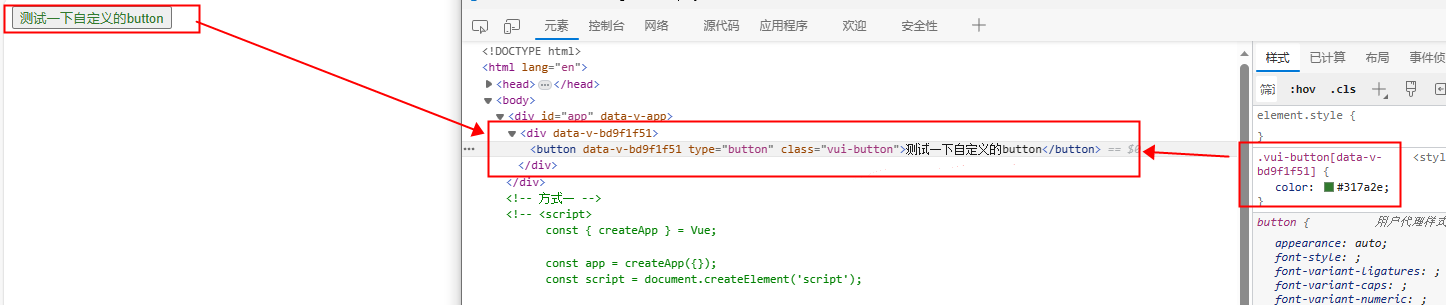
在 example/ 下新建 demo/vue3Demo.html,将生成的文件引入到 html 页面中,测试组件库是否正常工作:
<head>
  <script src="https://unpkg.com/vue"></script>
</head>
<body>
  <div id="app">
    <vui-button>测试一下自定义的button</vui-button>
  </div>
  <script src="../lib/vui.umd.js"></script>
  <script>
    const { createApp } = Vue;
    const app = createApp({});

    app.use(window.Vui);
    app.mount('#app');
  </script>
</body>
可以看到,效果一切正常:
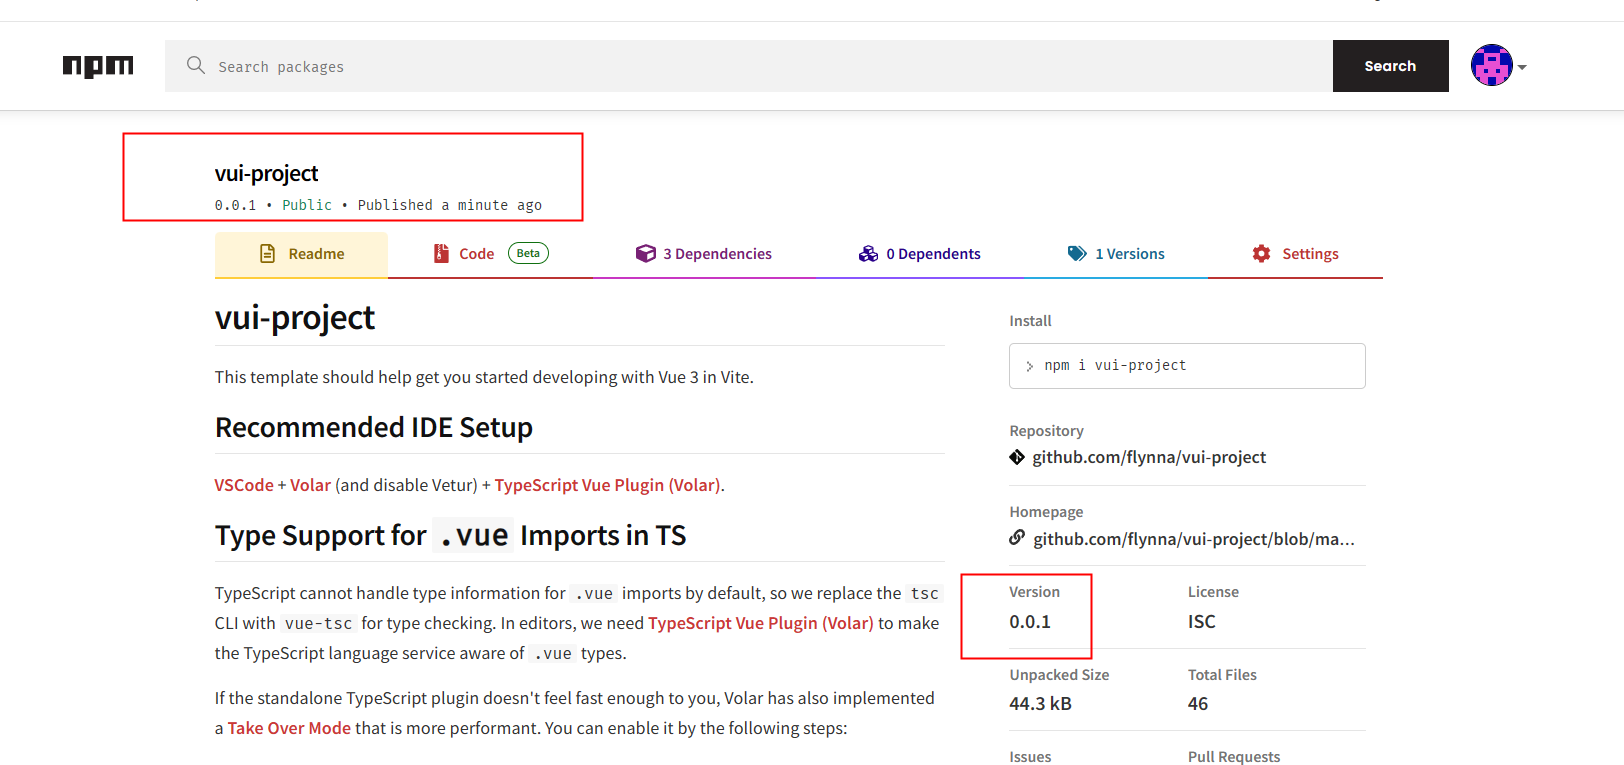
组件库发布
修改 package.json 配置
同时,移除 example 相关的脚本指令,例如:build、build-only,同时将 dependencies 中的 vue 相关依赖移到 devDependencies。并添加组件包的前置依赖 vue^3(example 相关资源只在开发环境下调试使用)。
{
  // ... 移除 private: true 配置
  "version": "0.0.1",
  // npm 包入口
  "main": "lib/vui.mjs",
  // cdn 相关
  "unpkg": "lib/vui.umd.js",
  // package description keywords
  "author": "hrlin <flynnzhl@qq.com>",
  "homepage": "https://github.com/flynna/vui-project/blob/main/README.md",
  "license": "ISC",
  // 添加发布指令钩子
  "scripts": {
    // ...
    "prepublishOnly": "npm run build:lib"
  },
  // 指定需要发布的文件,效果同 .npmignore
  "files": ["lib"],
  // 发布配置
  "publishConfig": {
    "access": "public",
    "registry": "https://registry.npmjs.org"
  },
  // 仓库配置
  "repository": {
    "type": "git",
    "url": "https://github.com/flynna/vui-project.git"
  },
  // bugs
  "bugs": {
    "url": "https://github.com/flynna/vui-project/issues"
  }
}
修改 npm.registry 配置
因为公司在内网搭建的 npm 服务,所以如果我需要将包发到 npm 官网,需要修改 npm 源:
npm config set registry https://registry.npmjs.orgok,修改成功,执行发布脚本(文章开头有提到如何发布一个 :npm 包)
npm login
# 输入账号密码邮箱验证码... 没有账号可以先注册一个
npm publish
发布成功
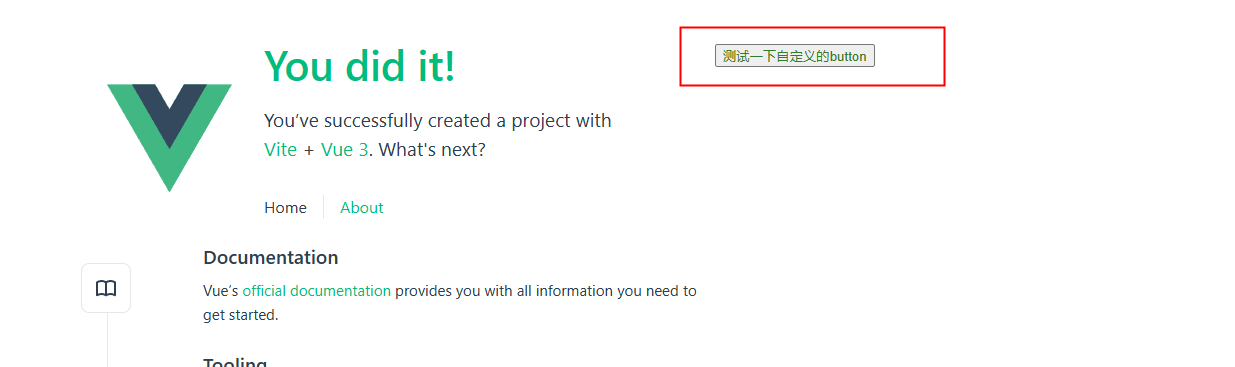
测试 CDN 服务是否有效(本地测过了,直接引用 cdn 功能正常的),效果图如下:

项目里使用
yarn add 安装模块 vui-project,在 example/main.ts 中引入组件库。
Tips:
因为测试项目
example和我组件库自身共用一个包(package.json)的缘故,调试完成我就把安装的vui-project移除了,避免产生循环依赖对后续版本发布产生影响。安装自身模块仅是为了测试模块发布后是否可用,仅测试功能的话可以不安装可以直接引入
build过后的产物即可。
import { createApp } from 'vue';

// 测试自定义的组件
import Vui from 'vui-project';
// import { Button, Text } from 'vui-project'; 经测试,组件单独注册也是可以的...

import App from './App.vue';

const app = createApp(App);

app.use(Vui);
// ...
app.mount('#app');
App.vue 修改,添加自定义的组件:
<template>
  <!-- ... other template -->
  <vui-button>测试一下自定义的button</vui-button>
</template>
效果:
组件库文档搭建
Tips: 由于
Vuepress依赖的vue-server-renderer版本需要和vue保持一致,而我这个测试的组件库是基于vue3实现的,所以文档和调试项目example并没有共用一个package.json